Showing posts with label Contemporary quilts. Show all posts

Sunday, 20 February 2011

February Journal Quilt Finished


Well here it is at last! I've been suffering with a flu like bug this week so was a bit slow getting on with the binding. It took me a while to decide but in the end I used a Ricky Time multicolour hand dye as I think it complements the quilt colours. I've added sequins to the wax crayon band and was tempted to add more beads but I think I'll leave it at that.

This was the original inspiration for my design:
The earthenware plaque was designed by Charlotte Rhead in 1935. You can read more about the designer and see some of her work on the Stoke Museums website.
There are lots of pictures of ceramics designed by other famous names on the site including the most well known - Clarice Cliff.

Earlier this week I spent several hours playing with EQ7 designs. I wanted to make some greetings cards. I ordered them online and they arrived this weekend. Only trouble was they weren't quite as I expected! I hadn't realised, when I browsed through the cards section on this particular website, that some were folded like birthday cards and some were just a single card like an inviatation or announcement. It just so happens that the square cards are the flat ones - oh dear!

I'm very pleased with the pictures - here are a couple of them:

They are on a nice weight of glossy card and the colours and detail are lovely. So today I went to the hobby store to buy white card to make square folded cards and glue dots to stick my lovely pictures on the front. So the moral of the story is: read shopping websites carefully to make sure you get what you really want!


Saturday, 19 February 2011

Swap Quilt Surprise!


Look what the postman brought me - Hooray!! It's my ALQS swap from Margeeth in the Netherlands. Isn't it beautiful? I am so delighted. Margeeth screen printed the design and machine quilted intricate patterns all over. I've never tried screen printing myself so perhaps I should have a go for one of my journal quilts. Thank you Margeeth for making such an inspiring quilt!

Thanks also to Kate North for organising the quilt swap. She's promised another soon so keep an eye on the ALQS blog for news and also to see the other quilts made for this swap.

Tuesday, 8 February 2011

Oops!


 I finished the background quilting and stitched the detail on the curved band. Hoorah! Now to trim it to size - 10" square. Ooops! Now I bet you're thinking I cut off too much....... nope: it's too big!

In my enthusiasm to get going on the quilt I didn't check that the circles fitted inside the size limit for the Journal Quilt project before I fused them. So if I cut it down to the required size I lose the edges of nearly all the circles. I'd intended the green circle to be off the edge but not the others. Just straightened and trimmed the quilt would measure 11" square. Trimmed to 10" (allowing for binding it would look like this:

Perhaps I'm just being too fussy - there's not much difference is there? So I now have to decide whether to finish it to 11" and make another quilt for the Journal Project or lose those complete circles. What do you think?

Monday, 7 February 2011

Journal Quilt in Progress

I've decided to try a new venture for me this year - the Contemporary Quilt Group Journal Project. The group has a journal project each year and this year it starts in February. There are very few rules apart from the size (10" square) and in the first 4 months it must include a circle (with other things to include later in the year). As you can see I've done that!!

I started with a browse through my books on Art Deco ceramics. I particularly love Clarice Cliff's pottery but also visited an exhibition in London a few years ago of ceramics from the Hermitage in St Petersburg  which feature geometric shapes in striking colours. This is all right up my street! I love geometry and especially circles so I keep coming back to simple shapes and bright colours. This design was developed from a pattern around a bowl.

Anyway after drawing out a design - the curved 'ribbon' I traced it onto fabric and coloured using wax crayons. Then I drew random circles to fill some of the white space but decided to applique them in hand dyed fabric. I found some dyed silk satin in my stash in just the right colours so fused them on.

So far I've embroidered blanket stitch around the circles and some other automatic stitch patterns along the curves:

Here's a close up of the embroidery:


I added trapunto behind the circles using what I am calling 'glue stick trapunto'. Basically I ran a washable glue stick around the inside of the back of each circle close to the buttonhole stitching. I finger pressed on pieces of wadding a little larger than needed. When the glue had dried I was able to fold back and trim away the excess wadding to make a pretty neat circle - quick and easy!

This evening after work I started background quilting and I can't believe how well the cicles have 'puffed up'. I had to take the photo under the light of my machine but hopefully you can see the raised circles. So next I have to finish the background and stitch detail on the centre of the 'ribbon'. I'll be back later in the week to show you my progress.

Sunday, 23 January 2011

Mini Quilt and Pay it Forward

Where has this month gone? It seems to be flying by and I can't believe it's two weeks since I last blogged. Last weekend was pretty busy with a family trip to see the Strictly Come Dancing Roadshow - Fab-U-Lous! I also went to colloege on Sunday. Then of course work most of the week but with time for coffee,  lunch and tea with friends on different days . This weekend is my first 'free' one this year so I've been having a little playtime (see photo) - more on that later.

I had a lovely surprise earlier in the week when I got an email from the 'Vegetarian Hunter' to say she had nominated me for a Liebsters blog award. She posted about it on her blog: http://veggiehunter.blogspot.com/2011/01/happy-surprise.html. 
Thank you Carolyn!

Now I have to nominate some of my favourite blogs with fewer than 300 followers. I've had to think long and hard about this as so many of you out there inspire me! Well here goes:

First Quilt Times my friend QuiltSue has a great sense of humour and organises a Christmas Quiltalong which helped me complete several Christmas projects last year.

Second: A Quilters Journal Janet was one of the quilters (with QuiltSue) who persuaded me to try blogging and changed my life!!

Next Quilting Prolifically  Trudi makes an amazing number of quilts, postcards and other items.

Finally Mamacjt I love Carol's bright and cheerful quilts and her lovely bird pictures. It was she who inspired me to make my mini art quilt yesterday!

I could add a whole load more blogs but I'd better stop there! Sorry I couldn't include you all!

So onto my mini quilt. I'd read about colouring on cloth with wax crayons on Mamcjt and decided to have a go. Carol had posted a little while ago about colouring mandalas so first I did a little circular doodling:

This was fun but as I moved onto the dining table to draw some more circles this caught my eye:

A coaster with a lovely simple design! So here's a little tutorial for a really quick and easy project:

1. Cut a piece of freezer paper to A4 (letter) size and iron onto white fabric.

2. Take a plate or bowl  and place over the edge of the fabric, draw a curve with a sharp pencil (click on the photos to see a larger view:

Move the bowl slightly and draw a second line, repeat to draw a third line. Draw groups of 3 lines on 3 sides of the fabric:
3. Using wax crayons colour the fabric:
4. Cover the coloured  fabric with another piece of cloth and iron to set the wax. When you can smell the wax it should be done!

5. Remove the freezer paper then layer and quilt. I just used my walking foot and a dark thread to outline the shapes then used white thread to echo quilt. Of course you could free motion stitch in the background like Carol does on her fantastic pictures here

Here's a close up of my finished design:
You can see the wax shows the texture of the weave on the cotton where I've coloured lightly. In areas I coloured more heavily this doesn't show so much. I'd like to try it on a smoother cotton sheeting. I was also thinking of other 'what ifs': What if I use different sized circles or different shaped objects such as our square-ish plates or the oval ice-cream container, what if I use more or less than 3 lines in a group ...... I'm sure you can think of other variations too!

If you have young children or grandchildren this would be a really fun project for them - just get them to draw and colour a picture on freezer paper backed cloth and then quilt to make a table mat or cushion!

Let me know if you have a go - I'd love to see your ideas.

Friday, 7 January 2011

Painting by Numbers?


 It's snowing again today and I'm glad I don't have to go out! I decided to continue playing with my circles and squares design which I made by following the step by step instructions in my new book 'Design Explorations for the Creative Quilter'. As you can see in the photo above I've been painting the design. I used a little watercolour paintbox and just kept mixing the colours up and painting in sections just like painting by numbers. Katie Pasquini Masopust says you shouldn't think about it - just paint! When I stand back I can see some colours I like and some I don't so I think I'll trace the design again and try painting with the colours I like.

The design started as several circles drawn on tracing paper then rearranged:

 Then I drew some squares and rectangles and layered those with the circles. There were too many lines here for my liking so when I traced the design for painting I just left some out!
 There are some beautiful examples of finished quilts designed this way in the book. They appeal to me because they are very geometric and I think they would work well with my hand-dyed fabrics.

Yesterday I found further inspiration in a couple of photographic galleries Martin and I visited on a day out. We went to Northallerton: a lovely market town in North Yorkshire and home to the Joe Cornish Gallery. Joe is a landscape photographer who takes stunning views of the local landscape. His gallery is fun to visit and it also has lots of local crafts on display too - jewellry, bags, scarves etc.

After a delicious lunch in Lewis and Cooper, an amazing delicatessen we carried onto Richmond. Richmond is famous for its castle overlooking the river and its cobbled market square. We were visiting the railway station. This one sadly doesn't have any trains running but has been restored as a gallery, cafe, and  heritage centre with several small shops selling locally produced goods.

This week there is an exibition of photos by local photographer Gary Brannigan and they are stunning! Many were close-up views of nature and a real inspiration for colour and pattern. My favourite was one of seaweed - honestly it was much better than this sounds! Take a look by clicking here.

Here are some views of the inside of the restored station:


It's well worth a visit and be sure to go to the bakery and brewery and perhaps in warmer weather the ice cream parlor! There is even a quilt group which meets monthly and a knitting group too.

Wednesday, 6 October 2010

Trapunto, Quilting and Binding by Machine

At the moment I'm working on designing a wholecloth quilt for my college course. I've always loved traditional 'North Country' or 'Durham' quilts and longed to make one but haven't the patience or skill to hand quilt a big project. Mine will be machine quilted and I'm practising free motion quilting and other techniques such as trapunto. In the sample above the centre motif has two extra layers of wadding (80/20 Hobbs Heirloom) on top of a base layer which gives a very raised effect. I learned this technique from Philippa Naylor who uses it in her quilts.

I'm also trying out different bindings. On this next sample I tried a piped binding finished entirely on the machine!
Ricky Tims demonstrates this on his DVD 'Grand Finale'. I love it! It takes a little extra time to make the piping and mitre the corners but then there is no hand stitching to do. Although my sample isn't perfect by any means I definitely want to use this again.

I can't recommend Ricky's DVD highly enough because there is so much to learn on it. He demonstrates squaring the quilt, free motion quilting, using thicker threads in the bobbin, designing feather quilting designs, piped bindings and more. You can see him doing all of this on his Dragon Rhapsody quilt as well as on smaller samples. I know lots of people who think it's impossible  to use an ordinary sewing machine to quilt a full sized quilt but Ricky does just that on this video.

I have a long list of other design techniques and quilting styles to practise. I'm having fun working through them and I'm  getting much more confident in free motion quilting. It really does get easier with practice!

Thursday, 30 September 2010

Photos on Fabric

I took my completed college embroidery samples book to my quilt group meeting on Tuesday evening and several members were intrigued by this one. It's really very simple - a photo printed on fabric, applied to a background with fusible web, then stitched. The stitching adds detail and colour, as in the sky. I've used this technique before, for example for this bag which I designed for my City and Guilds Diploma:
I bought pre-prepared fabric sheets called 'Miracle Fabric Sheets' which are available from Rio Designs here in the UK and work out at £1.50 a sheet. There are several other brands available and you can get different qualities of cotton and silk to print too.

The fabric is mounted on paper so it can easily feed through a home printer. I did edit the background of the flower photo in Photoshop Elements and made the colour more intense before printing but the picture of Mount Grace Priory wasn't enhanced. The fabric should be pressed after printing to set the ink then you simply peel off the paper and can use it as normal. It remains soft and supple unlike T-shirt transfer paper which to me feels  rubbery and stiff.

There are lots of books available about using printed photos in quilts. I have this one which I think has lovely simple but effective ideas:
Unfortunately it seems to be out of print now but you may be able to find a second hand copy on Amazon or other sites.

I've uploaded a slideshow of all my embroidery samples which are mostly mini quilts on my Textile Techniques website.

Monday, 20 September 2010

Catching Up and Moving On


This weekend was 'back to school' for me - the start of the new year for my City and Guilds course. I've not had time to blog because the last two weeks has been non-stop catch up on last year's work.  I got a bit behind and as usual left it almost to the last minute to get down to finishing off! The photo above is of one of my 26 embroidery samples which all measure 10" by 12". I'll post pictures of the others on my City and Guilds blog later this week. It is rusted fabric with holes burnt through to reveal the shiny metallic fabric beneath. It's one of my favourite pieces.  I'm really pleased I finished the module, had it 'signed off' and can now put it away and move on.

In the coming 10 months we'll be completing two new design and make modules - Wholecloth Quilt and Quilted Wallhanging. I'm really looking forward to these two and am eager to get started with the wholecloth quilt. I'll be planning a design from a source of inspiration, making samples to trial techniques and, of course, making the quilt.

To get me in the mood today I've been looking through my photos from the recent Great Northern Quilt Show and picking out lots of inspiring wholecloth quilts.
First a stunning hand quilted traditional quilt  by Heather Walker- look at the detail below to see the lovely stitching.


Here's another made on a lemon fabric by Beryl Baker:

There were smaller traditional quilts in the cot quilt section;
 This one is called 'Lullaby' by Jacquie Harvey - lovely!
Jacquie Harvey had a solo exhibition with several other pieces in the show - all absolutely stunning. She called them 'A Little Love in Every Stitch'. All have previously won prizes in other shows.
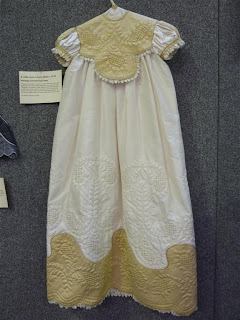
 Heritage Christening Gown
 Wedding Waistcoat

 I Wonder as I Wander
'Wax Lyrical' above was coloured with wax crayons!

On our course we are encouraged to try new ideas so although we will start with one piece of fabric we may choose to add colour by dyeing, painting etc so I was also looking for more contemporary quilts which would perhaps be included in a more modern interpretation of wholecloth.

Another solo exhibition by Cherilyn Martin, although not wholecloth because each was made of several panels, used stitch on dyed and embellished cloth. This example included a very traditional looking gold silk panel.


Here's a closer look which showa the quilting and embroidery on the coloured silk:


And another piece  had been discharged (bleached) to add designs on dyed fabric. This is something we will be trying out at college next month.
The City and Guilds syllabus doesn't clearly state a definition of a contemporary wholecloth quilt other than saying the stitching should be the main feature. I wonder if  it is be acceptable to print images onto the quilt for example like in this quilt ( I showed it in my last post on the show) which has transferred photos of leaves:

What do you think? What is your definition of a wholecloth quilt?

Sunday, 2 May 2010

My House Workshop


Yesterday I taught a workshop for the local branch of the Quilters Guild and had a really great day. The photo above show most of the ladies with their house quilts and what a lovely band of quilters they are! We had fun designing our pictures, fusing fabric and practising machine quilting. As you can see everyone's designs are very different. Some are based on a real house and some are fantasy!

I started by showing some of my quilts and the starting point for this project:
and here are a few of the students quilts in progress:

I love the rectangular tree in this.

The picture extends into the border - a great idea.

Lovely fabrics and a fabulous tree.

A bird perched in the tree - wow!
I didn't manage to take photos of all the quilts so the next couple are cropped from the group photo and are a bit fuzzy. Sorry about that - Although you can't really see the lovely fabric choices I wanted to show how creative these are:

Not only a beautiful house but a line of washing too!
Two little bird houses and birds in a tree!
     
 Haven't they done well?! Everyone loved the freestyle, no rules approach so all in all a very creative and enjoyable day. Many thanks to Jean for organising the workshop and also to Pippa and Glenda for the help and tea making!